Writing a simple search engine in PHP

Writing a search engine for your LAMP server is actually fairly simple. I realized I could simply use grep for the search algorithm and have the search engine use regular expression metacharacters. I mean, why reinvent the wheel? Of course, a search engine that crawls the entire web will be more complicated; this one just searches the local web server.

Here is the code I’ve written. It uses less than ten lines of PHP code, and even what I have here has some parts that are rather superfluous (I should probably streamline it)…


 1 <!DOCTYPE html>
 2 <!-- A simple search engine written in PHP -->
 3 
 4 <html>
 5 <head>
 6 <title>Search</title>
 7 </head>
 8 
 9 <body>
10 <?php
11 if( is_null( $_GET['query'] ) ){
12 ?>
13 <!-- No query performed yet -->
14 <form action="<?php echo $_SERVER['PHP_SELF']?>" method="get">
15 Enter a query:<br>
16 <input name="query" type="text"><br>
17 <input type="submit" value="Search">
18 </form>
19 <?php } else { ?>
20 <!-- Query has been performed -->
21 <?php
22 exec( "grep -ril \". $_GET['query'] . "\" *", $files );
23 $length = sizeof( $files );
24 for( $i = 0$i < $length$i++ ){
25         echo( "<a href=\". $files[$i] . "\">. $files[$i] . "</a><br>\n);
26 }
27 ?>
28 <?php } ?>
29 </body>
30 </html>

Since the search algorithm is simply a front-end for grep, I didn’t really have to think about its implementation. Basically, the script has a decision statement that looks at the superglobal variable $_GET['query']. If it’s null, that means the query hasn’t been submitted yet, so it shows the prompt for the query. If it’s not null, it shows the results of the query, which is of course a regular expression. The results are obtained by greping the local server filesystem and returning all files that contain that pattern.

One thing that makes PHP code somewhat confusing is the way you can have a PHP script interleaved with HTML code. It’s one of those things you just have to get used to.

Possible enhancements include:

  • Using egrep instead of grep so the user can use extended regular expressions.
  • Adding the ability to search for images, videos, and other media on the server, rather than just web pages (this could be done by returning any such media that are used by pages that match the pattern).
  • Searching filenames in addition to file contents (you could use find for this).
  • Using a ranking algorithm (currently it just lists them in the canonical order returned by grep).
  • And of course adding CSS and other formatting to make the page more aesthetically pleasing.

Making a Snoopy calendar in Unix

For those of you who don’t know, the Snoopy calendar is a gimmick of the hacker culture. It basically refers to a line printer calendar for 1969 featuring the iconic beagle from Peanuts, that apparently hangs on the wall of every Real Programmer’s office. I’m not entirely certain of the origins of this meme, but it dates back at least to the humorous essay Real Programmers Don’t Use Pascal, which was posted to Usenet back in 1983.

snoopy

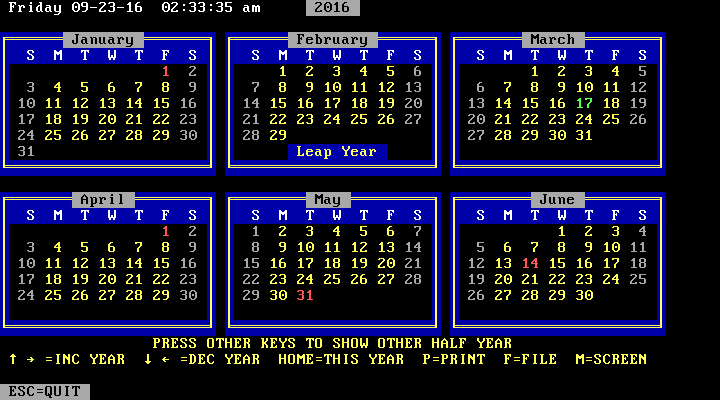
I have a certain fondness for this particular gimmick which I can’t quite explain. Perhaps it is the fact that it provides a feasible and exciting challenge for me – that of making my own Snoopy calendar. I have actually done this a couple of times.  This time I used a combination of C programming and several Unix programs like enscript, figlet, cal, and sed.

There are three components to the Snoopy calendar. The first is the Snoopy ASCII/line printer art, the second is the calendar, and the third is the year number banner. These components must be pasted together in the same text file, which can then be converted to Postscript for printing. The Unix paste program is not satisfactory for this, since it doesn’t align the text, so I wrote my own program. Here is the final result:


  1 /*************************************************
  2  * Paste V. 1.0                                  *
  3  *                                               *
  4  * Description: Pastes two files side-by-side    *
  5  * with the edges aligned.  Does not work with   *
  6  * files that contain tabs.                      *
  7  *                                               *
  8  * Author: Michael Warren                        *
  9  * License: Micheal Warren Free Software License *
 10  * Date: November 13, 2016                       *
 11  *************************************************/
 12 
 13 
 14 #include <stdio.h>
 15 #include <stdlib.h>
 16 #include <string.h>
 17 #include <errno.h>
 18 
 19 // Maximum line length
 20 #ifndef _MAXLL_
 21 # define _MAXLL_ 80
 22 #endif
 23 
 24 struct line{
 25         int linenum;
 26         int linelen;
 27         char text[_MAXLL_]; // Text of line
 28         struct line *next;  // Next line in current file
 29         struct line *corr;  // Corresponding line in other file
 30 };
 31 
 32 struct line *topl; // Top of left file
 33 struct line *topr; // Top of right file
 34 struct line *curl; // Current line in left file
 35 struct line *curr; // Current line in right file
 36 
 37 int mainint argc, char **argv ){
 38         FILE *l, *r;                // left and right files
 39         int llen = 0, rlen = 0;     // Number of lines in each file
 40         int rmaxll = 0, lmaxll = 0// Length of longest line in each file
 41         if( !argv[1] || !argv[2] ){
 42                 printf"\nUsage:\n%s <leftfile> <rightfile>\n\n", argv[0] );
 43                 return 1;
 44         }
 45         if( (l = fopen( argv[1], "r" )) == NULL ){
 46                 fprintfstderr"%s: ", argv[0] );
 47                 switch( errno ){
 48                         case EPERM   : fprintfstderr"Operation not permitted.\n" ); break;
 49                         case ENOENT  : fprintfstderr"%s: No such file or directory.\n", argv[1] ); break;
 50                         case EINTR   : fprintfstderr"Interrupted system call.\n" ); break;
 51                         case EIO     : fprintfstderr"Input/outpur error.\n" ); break;
 52                         case EDEADLK : fprintfstderr"Deadlock avoided.\n" ); break;
 53                         case ENOMEM  : fprintfstderr"Cannot allocate memory.\n" ); break;
 54                         case EACCES  : fprintfstderr"Permission denied.\n" ); break;
 55                         case ENODEV  : fprintfstderr"Operation not supported by device.\n" ); break;
 56                         case EISDIR  : fprintfstderr"%s is a directory.\n", argv[1] ); break;
 57                         case EINVAL  : fprintfstderr"%s: Invalid argument.\n", argv[1] ); break;
 58                         case ENFILE  : fprintfstderr"Too many open files in system.\n" ); break;
 59                         case EMFILE  : fprintfstderr"Too many open files.\n" ); break;
 60                         case EFBIG   : fprintfstderr"File %s is too large.\n", argv[1] ); break;
 61                         default      : fprintfstderr"An error occurred.  Error #: %d\n", errno );
 62                 }
 63                 return errno;
 64         }
 65         if( (r = fopen( argv[2], "r" )) == NULL ){
 66                 fprintfstderr"%s: ", argv[0] );
 67                 switch( errno ){
 68                         case EPERM   : fprintfstderr"Operation not permitted.\n" ); break;
 69                         case ENOENT  : fprintfstderr"%s: No such file or directory.\n", argv[2] ); break;
 70                         case EINTR   : fprintfstderr"Interrupted system call.\n" ); break;
 71                         case EIO     : fprintfstderr"Input/outpur error.\n" ); break;
 72                         case EDEADLK : fprintfstderr"Deadlock avoided.\n" ); break;
 73                         case ENOMEM  : fprintfstderr"Cannot allocate memory.\n" ); break;
 74                         case EACCES  : fprintfstderr"Permission denied.\n" ); break;
 75                         case ENODEV  : fprintfstderr"Operation not supported by device.\n" ); break;
 76                         case EISDIR  : fprintfstderr"%s is a directory.\n", argv[2] ); break;
 77                         case EINVAL  : fprintfstderr"%s: Invalid argument.\n", argv[2] ); break;
 78                         case ENFILE  : fprintfstderr"Too many open files in system.\n" ); break;
 79                         case EMFILE  : fprintfstderr"Too many open files.\n" ); break;
 80                         case EFBIG   : fprintfstderr"File %s is too large.\n", argv[2] ); break;
 81                         default      : fprintfstderr"An error occurred.  Error #: %d\n", errno );
 82                 }
 83                 return errno;
 84         }
 85         topl = (struct line *) mallocsizeofstruct line ) );
 86         topr = (struct line *) mallocsizeofstruct line ) );
 87         curl = topl; curr = topr;
 88         char c;
 89         // Build left file:
 90         while( (c = fgetc( l )) != EOF ){
 91                 ungetc( c, l );
 92                 curl->next = (struct line *) mallocsizeofstruct line ) );
 93                 curl = curl->next;
 94                 fgets( curl->text, _MAXLL_, l );
 95                 curl->linelen = strlen( curl->text );
 96                 lmaxll = (lmaxll < curl->linelen)?(curl->linelen):lmaxll;
 97                 curl->text[strlen( curl->text )-1] = '\0';
 98                 curl->linenum = ++llen;
 99         }
100         // Build right file:
101         while( (c = fgetc( r )) != EOF ){
102                 ungetc( c, r );
103                 curr->next = (struct line *) mallocsizeofstruct line ) );
104                 curr = curr->next;
105                 fgets( curr->text, _MAXLL_, r );
106                 curr->linelen = strlen( curr->text );
107                 rmaxll = (rmaxll < curr->linelen)?(curr->linelen):rmaxll;
108                 curr->text[strlen( curr->text )-1] = '\0';
109                 curr->linenum = ++rlen;
110         }
111         const int llenc = llen;
112         const int rlenc = rlen;
113         // Extend right file if shorter:
114         if( llen > rlen ){
115                 int diff = llen - rlen;
116                 forint i = 0; i < diff; i++ ){
117                         curr->next = (struct line *) mallocsizeofstruct line ) );
118                         curr = curr->next;
119                         forint j = 0; j < rmaxll; j++ ){
120                                 (curr->text)[j] = ' ';
121                         }
122                         (curr->text)[rmaxll] = '\0';
123                         curr->linenum = ++rlen;
124                 }
125         }
126         // Extend left file if shorter:
127         else if( llen < rlen ){
128                 int diff = rlen - llen;
129                 forint i = 0; i < diff; i++ ){
130                         curl->next = (struct line *) mallocsizeofstruct line ) );
131                         curl = curl->next;
132                         forint j = 0; j < lmaxll; j++ ){
133                                 (curl->text)[j] = ' ';
134                         }
135                         (curl->text)[lmaxll] = '\0';
136                         curl->linenum = ++llen;
137                 }
138         }
139         // Begin paste operation
140         curl = topl; curr = topr;
141         unsigned int len = (llenc < rlenc )?llenc:rlenc;
142         forint i = 0; i < len; i++ ){
143                 curl = curl->next;
144                 curr = curr->next;
145                 printf"%s  ", curl->text );
146                 int lendif = lmaxll - curl->linelen;
147                 forint j = 0; j < lendif; j++ ){
148                         putchar' ' );
149                 }
150                 printf"%s", curr->text );
151                 lendif = rmaxll - curr->linelen;
152                 forint j = 0; j < lendif; j++ ){
153                         putchar' ' );
154                 }
155                 putchar'\n' );
156         }
157         while( (curl = curl->next) != NULL ){
158                 curr = curr->next;
159                 printf"%s %s\n", curl->text, curr->text );
160         }
161         // Cleanup:
162         curl = topl->next; curr = topr->next;
163         while( curl != NULL ){
164                 struct line *auxl = curl->next;
165                 free( curl );
166                 curl = auxl;
167         }
168         while( curr != NULL ){
169                 struct line *auxr = curr->next;
170                 free( curr );
171                 curr = auxr;
172         }
173         free( topl ); free( topr ); fclose( l ); fclose( r );
174         return 0;
175 }

I created the banner using the following command:


figlet -f banner 1969 | sed "s/ /  /g" | sed "s/#/##/g" | sed "p"

The three sed commands are there to double the width and height of the banner. It results in the following output:


    ##        ##########      ##########      ##########    
    ##        ##########      ##########      ##########    
  ####      ##          ##  ##          ##  ##          ##  
  ####      ##          ##  ##          ##  ##          ##  
##  ##      ##          ##  ##              ##          ##  
##  ##      ##          ##  ##              ##          ##  
    ##        ############  ############      ############  
    ##        ############  ############      ############  
    ##                  ##  ##          ##              ##  
    ##                  ##  ##          ##              ##  
    ##      ##          ##  ##          ##  ##          ##  
    ##      ##          ##  ##          ##  ##          ##  
##########    ##########      ##########      ##########    
##########    ##########      ##########      ##########    


I then did some manual editing to round out the corners. I put this output above the output of cal -y 1969 in Vim, and then ran the program that I had written to paste it onto a Snoopy ASCII picture (I used a different picture this time). I then ran it through enscript, using landscape orientation and reducing the text size to it would all fit on one page, and also telling it to run in line printer emulation mode.

The final result:

snoopy4-cal

BSD Unix hack: adding conditional preprocessing capabilities to calendar

One of the most useful features of the GNU Compiler Collection is the -D option to cpp, which allows you to define macros at the command line. This in combination with #ifdefs and #ifndefs in the C/C++ source files allows for very versatile conditional compilation, because it allows you to set certain parameters that the program uses without having to edit the original source code. You can use this to, say, compile a debugging version of a program, among other things.

It is widely known that the C/C++ languages use CPP for preprocessing. What is less well-known is the fact that calendar, the default BSD reminder program, also uses CPP. This is one advantage that calendar has over the newer and more feature-rich remind program, which, as far as I know, doesn’t use preprocessing. calendar is available for all major BSD variants, including macOS. It may have been ported to other *NIXs such as Linux, though I am not sure, and I don’t feel like looking it up right now.

calendar uses CPP to allow for the conditional inclusion of several libraries of pre-written reminders or events – from the standard run-of-the-mill dates like US holidays and birthdays of famous people, to more exotic things like important events in the history of computing, and important dates in the Lord of the Rings timeline. This is done in the obvious way:


# include <calendar.usholiday>
# include <calendar.birthday>
# include <calendar.computer>
# include <calendar.lotr>

You can also do #defines, with or without parameters:


#define PHYSICAL( TIME ) Appointment with -NAME REMOVED- for yearly physical at TIME
#define PSYCH_APPT( TIME ) Appointment with -NAME REMOVED- at TIME
#define THERAPY( TIME ) Therapy appointment with -NAME REMOVED- at TIME

...

Jul 20  PSYCH_APPT( 3:00 PM )
Nov 15  PHYSICAL( 11:00 AM )
Nov 29  THERAPY( 2:00 PM )

Unfortunately, that’s about all you can do with CPP in the default calendar program. I decided I wanted to be able to include certain libraries conditionally, so that if I want to just view reminders for things I have to do in my own life, I have that option, and if I want to also check on upcoming holidays, or events in Tolkien’s universe, I can manipulate those options with a simple command line flag. The CPP code in my calendar file would then look something like this:


#ifdef _HOL_
# include <calendar.usholiday>
#endif

#ifdef _BDAY_
# include <calendar.birthday>
#endif

#ifdef _COMP_
# include <calendar.computer>
#endif

#ifdef _LOTR_
# include <calendar.lotr>
#endif

… And I would manipulate these options from the command line using a parameter like -D_COMP_.

So I got to work writing a frontend for calendar that adds that capability. Here is the result, written in bash and sed:


#!/usr/bin/env bash
# This script is a frontend for the calendar program that adds the
# full power of cpp to calendar.  Namely, it can do conditional
# preprocessing and #includes based on arguments given by the -D
# option to CPP.

declare -i DAYS=10

# Parse command line options:
for arg in "$@"
do
        case "$arg" in
                -W ) shift; let DAYS=$1; shift;;
                -B ) shift; let DAYS=-$1; shift;;
                -D ) shift; break;; # Define CPP macros
                -* ) shift; shift;;
        esac
done

# Debugging info:
#echo "DAYS=$DAYS"
#echo "\$1=$1"
#echo "\$2=$2"

# Preprocess calendar file and run it through a sed script that performs necessary edits
cpp -D${1:-"NULL1"} -D${2:-"NULL2"} -D${3:-"NULL3"} -D${4:-"NULL4"} -I /usr/share/calendar ~/.calendar/calendar 2>/dev/null | sed -f ~/Scripts/calendar.sed >| ~/calendar.tmp


# Print output of calendar
if [[ $DAYS -gt 0 ]]
then
        # Print forward
        command calendar -f ~/calendar.tmp -W $DAYS
elif [[ $DAYS -lt 0 ]]
then
        # Print backward
        let DAYS=-$DAYS
        command calendar -f ~/calendar.tmp -B $DAYS
fi

# Cleanup
rm ~/calendar.tmp
unset arg DAYS

The accompanying sed script:


#!/usr/bin/env sed

/^#/d
/^[0-9][0-9]*\/[0-9][0-9]* /s/ /\       /
/^[A-Z][a-z]* [0-9][0-9]* /{
        s/ /\   /
        s/ /\   /
        s/\     / /
}

After this I set an alias in my .bashrc file to have the calendar command run this script, rather than running the calendar program directly.

There are some problems with this script, the main one being that it is extremely slow, sometimes taking as long as 10-15 seconds to do the preprocessing. If I rewrote this program in C, I could speed it up by a few orders of magnitude, not only because C is inherently faster, but also because it exposes more of the underlying details of how everything is implemented, which allows you to program more intelligently and optimize your program for the hardware.

For example, I don’t know for sure whether comparing two integers is faster than comparing two strings in the bash shell (a problem I ran into here when trying to decide whether to just use a “true”/”false” string to determine whether to use -B or -W; the bash shell doesn’t have Boolean types), because I don’t understand the underlying implementation. I would have to spend days studying the source code for the shell to get a sense of how to optimize everything. All I know is that all shell variables are essentially strings, so it’s not the same as C, where comparing two integers is much faster than going through two character arrays and comparing each pair of characters one by one. In the bash shell, you have to convert the numerical strings to numbers, perform an arithmetic or comparison operation on them, and then convert them back to strings. Both methods are extremely inefficient. This is what I don’t like about extremely high-level scripting languages such as Unix shell, Python, Ruby, PHP, etc. But hey, they allow you to write programs a hell of a lot faster than C, which is better if you just want a quick-and-dirty solution to a programming problem.

Creating an MS-DOS floppy image from a directory in Unix

For a long time I have needed a way to transfer data into my DOS virtual machines. I came somewhat close to a solution by using Keka to archive directories as ISO files, but I was unable to create what I truly needed – a floppy disk image containing the archived contents of a directory. Well, now I’ve found a way to do just that, partly by doing some research on Google and partly by just figuring stuff out on my own.

The first thing you need to do is create a 1.44 MB empty file with an extension of .ima, .img, or some other raw floppy image extension. This can be done using dd, with the following command:


dd if=/dev/zero of=floppy.img bs=1024 count=1440

I took a screenshot of the output of dd for a visual:

dd

The next step is to format the file with an MS-DOS FAT filesystem.  The easiest way to do this is in DOS.  So insert the blank disk image in the VM and type format a:

format

Now you have a blank floppy image and are ready to add files to it.  To verify that the floppy had been formatted, I ran a hexdump in the Unix terminal.

hexdump

Next you need to mount the floppy image.  The easiest way to do this is to just double click on its icon in the GUI, then copy and paste the files from the source directory or directories to the directory that the image is mounted on.  I tested this first with a couple of simple standalone programs – Visicalc and DOS Cal:

adrive

Now I have installed two programs: CAL.EXE and VC.COM. Indeed, when I go to the C: drive and type cal, the program starts.

cal

Just a side note here: the default path in MS-DOS is set to C:\DOS, so if you want to run programs from a different directory you need to edit the search path in the AUTOEXEC.BAT file:

edit-path

For some reason, my DOS VM would only read the first floppy image that I created. Creating further floppy images using the same technique resulted in an Abort-Retry-Fail error message. To work around this, I have written a C program that automates the process of creating and formatting the floppy image, using the hexdump of the original image. That way I know the file will be exactly the same and I’ll be able to create multiple floppy images for software that requires a multi-disk installation. I will talk about this program, as well as MS-DOS 6.22, MS-DOS disk labels, and some additional software that I’ve installed in the next few blog entries. For now, farewell.

How to create a PDF of a Unix man page

Unix man pages are written in the troff language. There are three basic Unix programs that interpret troff code – nroff, troff, and groff. nroff is used for preparing documents for display in the terminal. troff prepares documents to be printed on phototypesetters, a technology that is pretty much obsolete by now. The Unix man program is essentially just a frontend for nroff that preprocesses the code with a set of macros known as the man macros and then pipes it into less.

What we will be using is the GNU roff program, or groff. groff is a troff interpreter that converts the troff code to Postscript. In order to apply the command, you first have to locate the man page you want to convert. On my system, most of the man pages are located in /usr/share/man. Let’s say we want to convert the file nmap.1 into Postscript. We would use a command like this:


groff -man /usr/share/man/man1/nmap.1 > nmap.ps

The -man option tells groff to run the code through the man macro package, which is the macro package used for man pages, before sending its output to the Postscript file.

Now we have a Postscript file, which is fairly easy to convert to a PDF. Many document viewing programs (such as Apple Preview) will automatically convert a Postscript file to a PDF when you open it. Alternatively, if you just want a hard copy, you can skip the PDF and send the Postscript file directly to a printer using the lp command. The only requirement is that it must be a Postscript printer, which the majority of printers on the market nowadays are.

Setting up an Apache HTTP server

Through some config file hacking, I have managed to set up an Apache HTTP server on my Macbook.  I did this so that I could test the full functionality of PHP.  Since PHP is one of the top most needed skills for freelance coding jobs, I figured it would be a good idea to learn it, and of course to use any of the features of PHP beyond just the core language, you need a web server.

Starting the Apache server is pretty easy.  All you have to do is type sudo httpd at the command line (assuming Apache is installed on your system, which I think it is for most Unix-based systems). It is recommended that you use apachectl as a frontend instead of using httpd directly, but I couldn’t seem to get this to work, so to start Apache I use sudo httpd and to stop it I use sudo killall httpd.

Now configuring the server to use PHP was somewhat more difficult, though still not too much so. First of all, for a server to use PHP, the PHP DOS initialization file needs to be present as /usr/local/lib/php.ini. After some digging around, I found the PHP ini file at etc/php.ini.default, so I just copied it (changing the filename of course).

The next thing I had to do was tell Apache to load the PHP module at startup. This is done by editing the file /etc/apache2/httpd.conf and uncommenting the appropriate code line.  It must be remembered that editing this file requires root privileges.

httpd.conf-uncomment

The appropriate line is


LoadModule php5_module libexec/apache2/libphp5.so

…Shown here already uncommented.

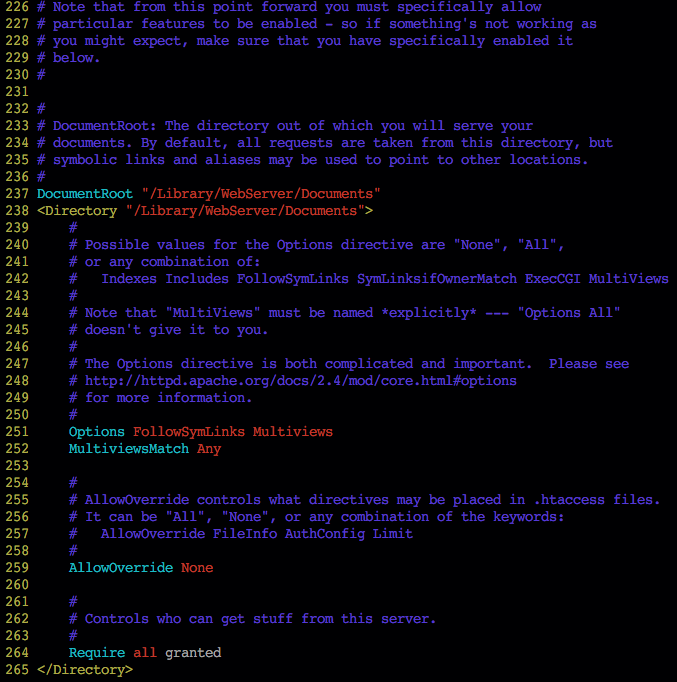
The next thing you have to do is find out what directory Apache is using to serve files to clients. This is determined by the DocumentRoot environment variable, and controlled by a <Directory> tag.

http.conf-root

Here we see that the server’s filesystem is rooted at /Library/WebServer/Documents. Of course this is Mac-specific, and the root will be different on other systems, and we can also change it, though I felt no need to.

If you title a document “index.html”, “index.php”, etc. then this will be the file that the client goes to when the user types your domain name without appending a path at the end. Also, if you title a document, say, my-pictures.html, the file extension can be omitted in the URL.

Unix error detection – cksum, md5sum, and shasum commands

This post will be a tutorial on Unix error checking. These commands are available in all Unix systems (that I have tested), though they have slightly different forms in each one.

Error detection codes are used to detect errors caused by either disturbances in a noisy communication channel, or deliberate modification by malicious users. There are many different methods of error checking. One form is called a checksum or hash. This is when some operation with even probability distribution is applied to the bytes, blocks, whatever, of a file at both ends of the channel to produce a much shorter value, called the sum. The sums at both ends are compared (usually by humans rather than by computers) to see if they match. If they don’t match, something has gone wrong in the transmission, and the values need to be retransmitted.

The first error detection command we will look at is the cksum command. cksum produces a checksum of a file by computing a remainder of a polynomial division of its contents. It then prints the checksum and the size of the file side-by-side.

bash-3.2$ cksum hackers.png
1967572667 13865 hackers.png

Here the first value is the checksum and the second value is the size of the file, followed of course by the name of the file.

We now compare these values to the values supplied by the site we downloaded the file from. If they match, we know the file probably downloaded correctly (it’s not an absolute guarantee, but the probability of an error is now known to be negligible).

cksum is used because it is fast and simple to implement. It has a couple of problems, though. First, implementations may vary. When using cksum you have to make sure you and the supplier of the file are using the same CRC code.

The second problem is that while CRCs protect a file from accidental modification by noise; they do not protect it from deliberate modification by malicious users. This is because multiple files can have the same checksum, and a middleman can easily inject a fake file into the network that has the same checksum as the one we are trying to download, despite being different. To guard against this sort of attack, we need what is called a one-way hash, which is a hash that is computationally very difficult to reverse.

There are a couple of these algorithms that are in common use on Unix systems. One is the MD5 algorithm, and the other is the SHA series of algorithms (in Unix the default is SHA-1). Each of these message digest algorithms, as they are called, has at least two forms – the form used in BSD systems (including Mac OS X) and the form used in Linux. Here is a table showing each of them:

Algorithm Linux form BSD form
MD5 md5sum md5
SHA-1 sha1sum shasum

Let’s look at a sample command in Mac OS X:

bash-3.2$ md5 hackers.png
MD5 (hackers.png) = d28903b7e06cd169f5e4ff59be348fb6

Unlike the cksum output, which is in decimal, the MD5/SHA-1 output is in hexadecimal. It is also much longer. Again, we compare this value to the one given by the providers of the file to make sure it is correct.

EDIT (November 11, 2016): Man, I’ve been putting off correcting this for too long.  I said something really stupid in this post, which was that a one-way hash has only one file mapped onto each hash.  Obviously, this is mathematically impossible, because a one-to-one function can only exist between two sets of the same size.  I have corrected it now.  God, this is a cringeworthy mistake, and I’m totally embarrassed by it.

An introduction to Unix archiving with tar and cpio

One of the principles of backup and recovery is that you should back up your files in as many formats as possible; that way if one format is discontinued, or the new version is incompatible with the old version, you don’t lose the ability to recover files from your backups. In this post I will share my knowledge of two Unix archiving utilities: tar and cpio. Both of these are non-interactive programs that can be run from the command line, and many more complex backup utilities (including graphical ones) are actually frontends for these and other command line utilities.

First of all, what is an archive? An archive is the result of taking a directory or a hierarchy of directories and merging it into a single file. That’s all it is (aside from the headers and footers of course). If you do a dump of an archive file with a program like less, you will see the contents of your files concatenated together. An archive is just a bunch of files mushed together into one huge file – no compression or encryption involved. Archiving is useful when you want to compress a directory or directory tree, or when you want to encrypt a bunch of files all at the same time (but these steps are of course separate from archiving).

Part 1: tar:

First I will go over tar. tar archives files in the TAR format, which stands for Tape ARchive. TAR files are typically compressed using the GNU Zip utility so they become .tar.gz or .tgz files. This format is used for distributing software in source form. It is also used as the main package format for some Linux distributions, including Slackware.

You create an archive with the -c option. Optionally, you can add -v for verbose output.

bash-3.2$ tar -cv Screenshots > Screenshots.tar
a Screenshots
a Screenshots/Arch Linux Startup.png
a Screenshots/Arch+Linux+top.png
a Screenshots/Arch+Setup+CLI.png
a Screenshots/Arch+Setup+MDI.png
a Screenshots/Arch-Linux-top.png
a Screenshots/Arch-mc.png
a Screenshots/Arch-top.png
a Screenshots/Arch_Linux_top.png
a Screenshots/crontab.png
a Screenshots/crontab~.png
a Screenshots/Cyberdogs-Level2.png
a Screenshots/Device_manager.png
a Screenshots/Elinks+Arch+Linux.png
a Screenshots/graphics-driver.png
a Screenshots/Installing ReactOS 1.png
a Screenshots/Installing ReactOS 10.png
a Screenshots/Installing ReactOS 11.png
a Screenshots/Installing ReactOS 12.png
a Screenshots/Installing ReactOS 13.png
a Screenshots/Installing ReactOS 14.png
a Screenshots/Installing ReactOS 2.png
a Screenshots/Installing ReactOS 3.png
a Screenshots/Installing ReactOS 4.png
a Screenshots/Installing ReactOS 5.png
a Screenshots/Installing ReactOS 6.png
a Screenshots/Installing ReactOS 7.png
a Screenshots/Installing ReactOS 8.png
a Screenshots/Installing ReactOS 9.png
a Screenshots/irix-3.3-img2.gif
a Screenshots/Log_file_troubleshooting_Slackware.png
a Screenshots/Lynx.png
a Screenshots/mc-menu.png
a Screenshots/mc-mono.png
a Screenshots/memtest.png
a Screenshots/Notepad.png
a Screenshots/pkgtool-1.png
a Screenshots/pkgtool-2.png
a Screenshots/ReactOS 1.png
a Screenshots/ReactOS 2.png
a Screenshots/ReactOS 3.png
a Screenshots/ReactOS 4.png
a Screenshots/ReactOS 5.png
a Screenshots/ReactOS_Command_prompt.png
a Screenshots/ReactOS_grey.png
a Screenshots/sc.png
a Screenshots/screen.png
a Screenshots/Screensaver.png
a Screenshots/serial.png
a Screenshots/solitaire.png
a Screenshots/Spash_screen.png
a Screenshots/Task_manager_1.png
a Screenshots/Task_manager_2.png
a Screenshots/Wheat_theme.png
a Screenshots/Wordpad-bug.png
a Screenshots/WordPad.png

Alternatively, you could type tar -cvf Screenshots.tar Screenshots for the same result.

Afterward, this file can be zipped using gzip.

Files are extracted from an archive with the -x option.

bash-3.2$ tar -xvf Screenshots.tar -C .
x Screenshots/
x Screenshots/Arch Linux Startup.png
x Screenshots/Arch+Linux+top.png
x Screenshots/Arch+Setup+CLI.png
x Screenshots/Arch+Setup+MDI.png
x Screenshots/Arch-Linux-top.png
x Screenshots/Arch-mc.png
x Screenshots/Arch-top.png
x Screenshots/Arch_Linux_top.png
x Screenshots/crontab.png
x Screenshots/crontab~.png
x Screenshots/._Cyberdogs-Level2.png
x Screenshots/Cyberdogs-Level2.png
x Screenshots/Device_manager.png
x Screenshots/Elinks+Arch+Linux.png
x Screenshots/graphics-driver.png
x Screenshots/Installing ReactOS 1.png
x Screenshots/Installing ReactOS 10.png
x Screenshots/Installing ReactOS 11.png
x Screenshots/Installing ReactOS 12.png
x Screenshots/Installing ReactOS 13.png
x Screenshots/Installing ReactOS 14.png
x Screenshots/Installing ReactOS 2.png
x Screenshots/Installing ReactOS 3.png
x Screenshots/Installing ReactOS 4.png
x Screenshots/Installing ReactOS 5.png
x Screenshots/Installing ReactOS 6.png
x Screenshots/Installing ReactOS 7.png
x Screenshots/Installing ReactOS 8.png
x Screenshots/Installing ReactOS 9.png
x Screenshots/._irix-3.3-img2.gif
x Screenshots/irix-3.3-img2.gif
x Screenshots/Log_file_troubleshooting_Slackware.png
x Screenshots/Lynx.png
x Screenshots/mc-menu.png
x Screenshots/mc-mono.png
x Screenshots/memtest.png
x Screenshots/Notepad.png
x Screenshots/pkgtool-1.png
x Screenshots/pkgtool-2.png
x Screenshots/ReactOS 1.png
x Screenshots/ReactOS 2.png
x Screenshots/ReactOS 3.png
x Screenshots/ReactOS 4.png
x Screenshots/ReactOS 5.png
x Screenshots/ReactOS_Command_prompt.png
x Screenshots/ReactOS_grey.png
x Screenshots/sc.png
x Screenshots/screen.png
x Screenshots/Screensaver.png
x Screenshots/serial.png
x Screenshots/solitaire.png
x Screenshots/Spash_screen.png
x Screenshots/._Task_manager_1.png
x Screenshots/Task_manager_1.png
x Screenshots/Task_manager_2.png
x Screenshots/Wheat_theme.png
x Screenshots/Wordpad-bug.png
x Screenshots/WordPad.png

This will create a directory called Screenshots in the current directory containing all the files archived in the TAR file.

Another option is to list a table of contents for the archive, without extracting it. This is done as follows:

bash-3.2$ tar -tf Screenshots.tar
Screenshots/
Screenshots/Arch Linux Startup.png
Screenshots/Arch+Linux+top.png
Screenshots/Arch+Setup+CLI.png
Screenshots/Arch+Setup+MDI.png
Screenshots/Arch-Linux-top.png
Screenshots/Arch-mc.png
Screenshots/Arch-top.png
Screenshots/Arch_Linux_top.png
Screenshots/crontab.png
Screenshots/crontab~.png
Screenshots/._Cyberdogs-Level2.png
Screenshots/Cyberdogs-Level2.png
Screenshots/Device_manager.png
Screenshots/Elinks+Arch+Linux.png
Screenshots/graphics-driver.png
Screenshots/Installing ReactOS 1.png
Screenshots/Installing ReactOS 10.png
Screenshots/Installing ReactOS 11.png
Screenshots/Installing ReactOS 12.png
Screenshots/Installing ReactOS 13.png
Screenshots/Installing ReactOS 14.png
Screenshots/Installing ReactOS 2.png
Screenshots/Installing ReactOS 3.png
Screenshots/Installing ReactOS 4.png
Screenshots/Installing ReactOS 5.png
Screenshots/Installing ReactOS 6.png
Screenshots/Installing ReactOS 7.png
Screenshots/Installing ReactOS 8.png
Screenshots/Installing ReactOS 9.png
Screenshots/._irix-3.3-img2.gif
Screenshots/irix-3.3-img2.gif
Screenshots/Log_file_troubleshooting_Slackware.png
Screenshots/Lynx.png
Screenshots/mc-menu.png
Screenshots/mc-mono.png
Screenshots/memtest.png
Screenshots/Notepad.png
Screenshots/pkgtool-1.png
Screenshots/pkgtool-2.png
Screenshots/ReactOS 1.png
Screenshots/ReactOS 2.png
Screenshots/ReactOS 3.png
Screenshots/ReactOS 4.png
Screenshots/ReactOS 5.png
Screenshots/ReactOS_Command_prompt.png
Screenshots/ReactOS_grey.png
Screenshots/sc.png
Screenshots/screen.png
Screenshots/Screensaver.png
Screenshots/serial.png
Screenshots/solitaire.png
Screenshots/Spash_screen.png
Screenshots/._Task_manager_1.png
Screenshots/Task_manager_1.png
Screenshots/Task_manager_2.png
Screenshots/Wheat_theme.png
Screenshots/Wordpad-bug.png
Screenshots/WordPad.png

Part 2: cpio:

cpio is different from tar. Unlike tar, it creates archives in the PAX format. PAX stands for Portable Archive eXchange. Also unlike tar, cpio reads the file list from standard input and writes to standard output.

Here is a typical cpio command for archiving a directory:

bash-3.2$ ls | cpio -oacvB > Screenshots.pax
Arch Linux Startup.png
Arch+Linux+top.png
Arch+Setup+CLI.png
Arch+Setup+MDI.png
Arch-Linux-top.png
Arch-mc.png
Arch-top.png
Arch_Linux_top.png
Cyberdogs-Level2.png
Device_manager.png
Elinks+Arch+Linux.png
Installing ReactOS 1.png
Installing ReactOS 10.png
Installing ReactOS 11.png
Installing ReactOS 12.png
Installing ReactOS 13.png
Installing ReactOS 14.png
Installing ReactOS 2.png
Installing ReactOS 3.png
Installing ReactOS 4.png
Installing ReactOS 5.png
Installing ReactOS 6.png
Installing ReactOS 7.png
Installing ReactOS 8.png
Installing ReactOS 9.png
Log_file_troubleshooting_Slackware.png
Lynx.png
Notepad.png
ReactOS 1.png
ReactOS 2.png
ReactOS 3.png
ReactOS 4.png
ReactOS 5.png
ReactOS_Command_prompt.png
ReactOS_grey.png
Screensaver.png
Screenshots.paxcpio: Screenshots.pax: Can't add archive to itself

Spash_screen.png
Task_manager_1.png
Task_manager_2.png
Wheat_theme.png
WordPad.png
Wordpad-bug.png
crontab.png
crontab~.png
graphics-driver.png
irix-3.3-img2.gif
mc-menu.png
mc-mono.png
memtest.png
pkgtool-1.png
pkgtool-2.png
sc.png
screen.png
serial.png
solitaire.png
3484 blocks

Both the command structure and the output look different from those of tar. Here, the output of ls is piped into the cpio program, which then has its output redirected to the file Screenshots.pax. The verbose output shows not just a list of files, but also the number of blocks transferred.

There are three basic options for cpio: -o tells the program to produce an archive file as output; -i tells it to take an archive file as input; and -p tells it to read a list of files from standard input and copy them to a specified directory.

cpio has a very nifty feature – it gives you the option to not change the atime (access time) values of the files you are archiving. This is accomplished with the -a switch. cpio does this by saving the old access times of each of the files, then resetting them to those values when it is done archiving the directory.

The -c option tells cpio to use the ASCII header format. This makes the archive more portable.

-v is of course the switch for verbose output. Without this, the program basically operates silently, with no indication of what it’s currently doing.

-B tells cpio to use blocks that are ten times the size of the blocks used by the operating system. This can make archiving and unarchiving more efficient. If you want to specify another size for the blocks, you can use the -C switch, followed by the number of bytes in each block.

Another difference between cpio and tar is that cpio uses the same basic switch for both extracting an archive and displaying a table of contents.

Here is a cpio command for extracting an archive:

bash-3.2$ cat Screenshots.pax | cpio -iv

I have omitted the verbose output here, because it looks pretty much the same as for the other cpio command. Here I have piped the contents of the archive into cpio from the cat command, and I’ve used the -i switch to tell it to take the archive file as input. There is no need to redirect the output of cpio because it essentially has no output.

Finally, here is the command for displaying the contents without extracting:

bash-3.2$ cat Screenshots.pax | cpio -it

That’s all for now.

NOTE: Feedback and corrections to this tutorial are welcome. I will be happy to correct any mistakes people point out. Also, if anyone can tell me how to get rid of those little black rectangles above and below the code blocks, that would be great. EDIT: Fixed